Proud owner of a brand new MacBook? Get ready for some mixture of joy and challenge irrespective of whether it is your first device or an upgrade. This guide will provide you information on how to smoothly set up your new MacBook.
Step 1: Remove the Device From the Packing and Power On
The first step of commencing activity on your new MacBook would be to remove it from its packaging and power it on. Press the power button found on the upper right corner of the keyboard. You will notice the Apple logo glittering against your screen once the device is ready.
Step 2: Language and Region Settings For the Device
Your region and language settings are required to set up the device. So as soon as? the Macbook is set up, choose a language and region from the preferences. This ensures your system displays the correct date, time, and other regional settings. Click on continue on completing the language requirements.
Step 3: Connect To The Internet – Wi-Fi Connection
Stable internet connection is a necessity in order for a MacBook to be set up. Proceed by selecting the “connect to wifi button”, type in the password of your network and connect to wifi.
Once the system has been connected to the internet, both the functionality of the Mac device as well as the Apple ecosystem registration can be done with absolute ease.
Step 4: Utilize your Apple ID for sign in
Now, if there is an Apple ID, proceed to use it. If it does not exist, it is quite a simple process to create one. Signing up allows you to use the App Store, iCloud, as well as Find My Mac services.
Benefits of Apple ID. For starters, an Apple ID helps create a safeguard of information which will make sure all of your data saved and accessible at all times. This also proves beneficial as money spent on apps, music, movies and more will not be a loss.
Step 5: Set up Siri (Optional)
If you would like to access the phone’s features with voice, you may have Siri enabled at the time of setting up the phone. Once enabled, many objectives can be completed without having to physically interact with the phone like text sending, information searching and numerous other things.
Setting up instructions: When enquired, select ‘Enable Siri’. If this is not a step that you would prefer to take, ‘Not Now’ is also a choice.
Step 6: Customize Your Settings
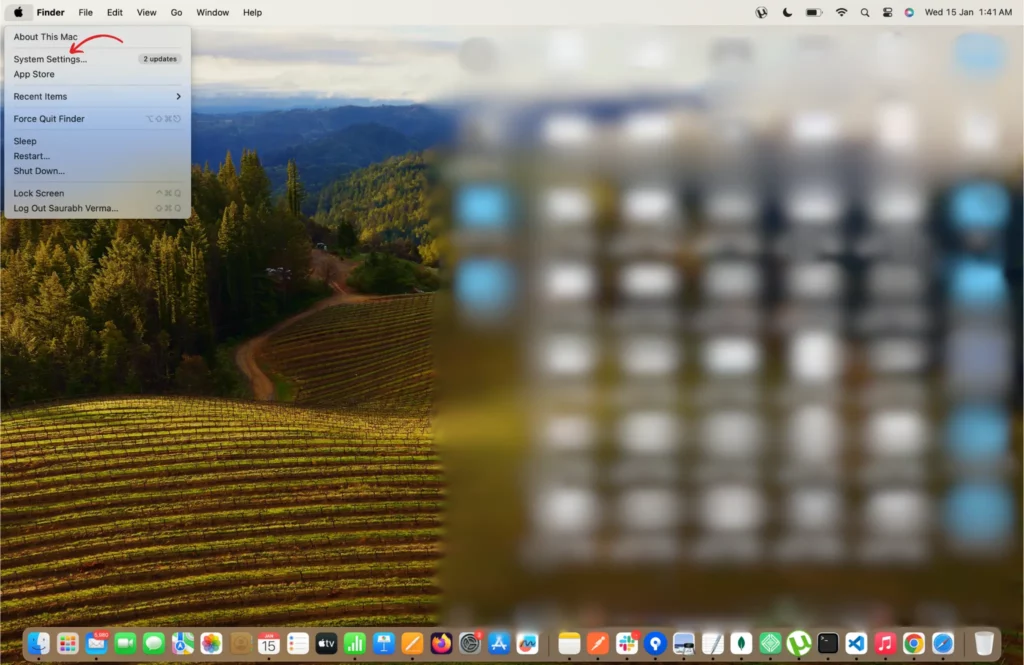
Determine whether or not your Mac is plugged into the network and has your Apple ID linked to it. In the section below, we will explain how to prepare you MacBook for proper completion of your tasks. All these things will make life easier and using your MacBook more enjoyable. You can begin changing your preferences by clicking on System Preferences or System Settings.
Go to the upper left side of the screen and click the Apple icon, then choose System Preferences or System Settings from the list that follows. Here, you can modify these important settings among others:
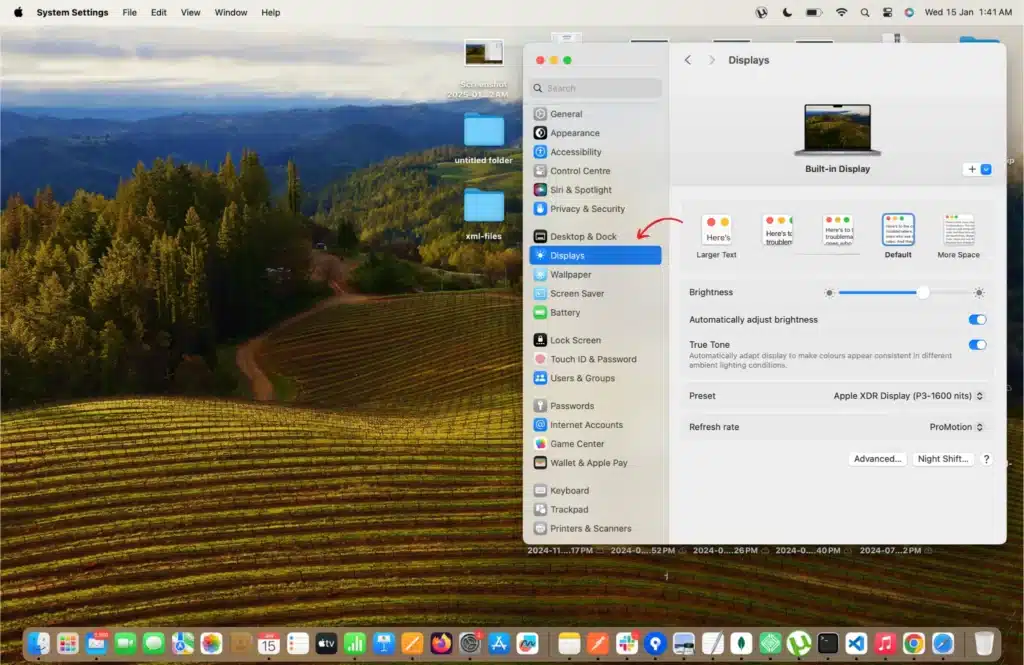
Adjusting the Display Settings
It is very important to set these parameters as these will greatly influence on how you intend to use your MacBook. Setting the screen brightness and adjusting the screen resolution may at times be essential depending on light in the situation you are working in and the type of work you are doing.
Brightness: Use the bar under Display Settings to alter the settings of your screen to optimal level for your environment; when in bright places, it is best to increase it. If you are in a dark setting, you may want to minimize the brightness to decrease eye strain and prolong the life of the battery.
Trackpad Settings
You can customize your display’s resolution based on clarity needs and available space. Scaled monitors can be set to different levels, meaning documents and pictures may require one setting while web browsing may need a lower setting to save on bandwidth. So, in the Display section, choose Scaled, and then pick a resolution from the list. This is how you control the clarity setting.
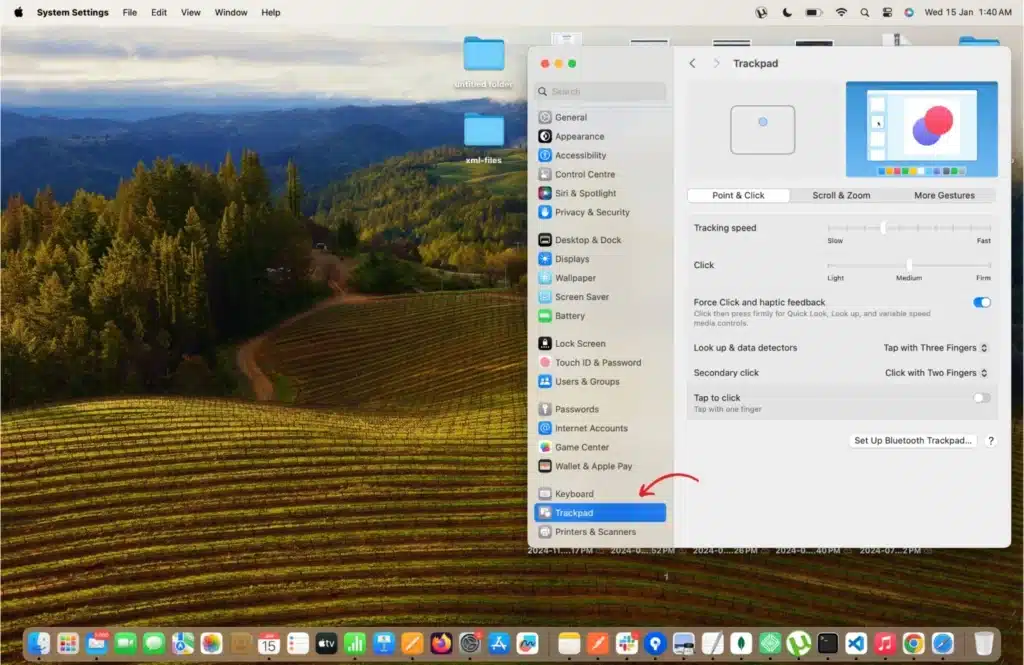
Macbook Trackpad Settings
The trackpad makes it easy for you to get the most out of your device because it is one of its powerful points. There are many gestures and actions that can be used to navigate through the macOS. These activities do create a rich interface, so knowing how to apply these adjustments may be beneficial.
Tap Click: This is a feature called Tap to Click which enhances touchpad experience significantly since it facilitates clicking without depressing the touchpad.
Tracking Speed: Move the slider for cursor tracking speed up or down to change how fast the mouse moves when you are scrolling on web pages. If, for example, you would like to work on these tasks at your own pace, this option may come in handy.
Setting Dock’s Appearance
All your app icons are located at the Dock which is the most important element when it comes to file program opening. When you set the Dock to your own liking, it boosts effectiveness when working on the MacBook as well.
Position: You are able to set the Dock any way that you wish. Either way, the Dock is placed at bottom side of the montior, and it is also possible to place it at right or left side which optimizes the available screen space. You need to go to System Preferences or System Settings > Dock & Menu bar and set Position on Screen to shift the Dock to the position which works best for you.
Icon Size: Also, the size of the icons in the Dock can be changed.
If larger viewable areas are desired or multiple applications need to be utilized at the same time, dragging the Size bar from its minimum position will effectively resolve those challenges. If a specific order needs to be achieved, then it would suffice to only change the size of the icons.
Adjusting Icons: One of the ways through which ease of navigation within the computer can be achieved is when the pointer is kept above the icons for a longer duration, the icons increase in size. If a little flexibility is welcomed, then allow the Magnification Adjusting Feature to be activated and simply adjust the slider to desired settings.
Recent Applications: One is able to control whether the Dock show applications that are actively or recently used by the user or not. In case you prefer the Doak to be tidy, then you can simply not check Show Recent Applications in Dock.
Step 7: Install Updates
There may be a latest System Software update for your MacBook system, and it is a good practice to check whether there are updates because it is very important for your unit’s functionality, while at the same time ensures that you do not have any of the recent problems that come with these vulnerabilities that are well known.
System Preferences or System Settings > Software Update is where these will be found.
Step 8: Set Up iCloud Backup
Apple achieved its own cloud storage by developing iCloud which is an excellent platform for saving photos, documents, applications, and different kinds of data. iCloud will already be functional by the time you use your Apple ID.
For more settings changes for Icloud, check System Preferences or System Settings > Apple ID > Icloud.
Make sure to activate Icloud drive so that all documents, applications, and files in the system are uploaded and stored automatically.
Step 9: Install Applications on the App Store
There is a plethora of applications sorted under categories such as work, creativity, entertainment and so on in the Mac app store. As getting apps requires minimal effort, the very first thing you need to do is get to the App Store located in the dock and see what apps you want to download.
Microsoft Office, Google Chrome, Slack and Adobe Creative cloud are among the most popular apps among common MacBook users these days.
Step 10: Migrate Data from Your Old Mac or PC (Optional)
For anyone wishing to move from an old device or even buy a new MacBook, transferring data and files is going to be extremely beneficial. In other terms, moving files, setting, and even applications from your old computer to your Macbook is an easy process. However, you have to make sure you do this using a program called “Migration Assistant.”
If you want to move from an old mac to a newer model, Apple’s Migration assistant is the quickest and least complicated thing to use. This program allows you to move your user accounts, applications, documents, and even system settings without breaking a sweat.
Preparation steps: To begin with, check if both macs are connected to a common wifi network.
If not, then it is suggested that thunderbolt, usb-c or even ethernet cables be used for data transfer.
Starting Migration Assistant: Open Migration Assistant on the older Mac via Applications and then Utilities.
On the newer Mac, open Migration Assistant: Similarly, when you are on the new Mac, open Migration Assistant. Then choose the option that reads: From other Mac.
Follow the Instructions on the Screen: The respective instructional commands will show on both Mac devices. You need to select the older Mac device from the list of devices shown. On your selection, you will get the choice of the other data you would like to transfer like files, apps, and system settings.
In this situation, you must select the older Mac and indicate which data you want transferred such as files, apps, and other system settings. The system will then seek affirmation and on confirmation, the migration will commence – it might take longer than expected so patience is required. Some of the old settings will be included on the new laptop you purchased.
Now For The PCs
Shifting from your Windows device into a Mac is simple and effortless as Apple invented the Windows Migration Assistant for this very reason. Follow the subsequent steps and this is how you do the transfer:
First, go ahead and download the Windows Migration Assistant: Navigate to the Apple site and download the Windows Migration Assistant for the version of windows that you are currently using.
Let’s move on to the next step and install the application: After Windows Migration Assistant has been downloaded, the next step is to set it up on the computer.
Go ahead and Connect the PC to the Macbook: For faster transfer speeds, connect your PC and Macbook through USB or Ethernet cable. Make sure that both connect to the same wi-fi network as well.
On your PC, get the migration assist: Look for the Windows Migration Assistant on the PC and run the program. Once it is started, follow the instructions that appear on the screen. At this point, you will decide which files need to be moved to the mac such as documents, pictures or other apps.
Finally and most importantly, on your Macbook, abide by the on-screen instructions: Switch On your new mac and start Migration Assistant so that he can help you in the data transference from the PC. The mac will recognize the PC that has the Microsoft Migration Assistant already available on it.
Transfer Files that are Due for Migration: Mark the files which require migration, and transfer them as per the guidelines. Depending on the size of the data that is to be migrated, this process may take some time to complete.
Step 11: Configure Time Machine so that Backups are Created Automatically on a Schedule
Time Machine, as an effortless form of backup, was created by Apple. The device allows the user to save files on an external hard drive for easy access, which means that all files can be accessed quite easily. To set up Time Machine, the device from which information will be extracted must first be plugged into the computer. Then, in System Preferences or System Settings, go to time machine > select backup disk.
Step 12: Discuss The MacBook Features
Mission Control
The personalization of your MacBook is ready. Let us now start discussing the specialized capabilities found in macOS. These attributes are built into the software and will definitely improve your efficiency and management with your MacBook.
Mission Control lets everyone stay mentally sane by being able to see all open apps, windows, and spaces at once. This application simplifies the management of task switching as well as the management of your physical workspace.
How to perform Mission Control: Put your palm on the trackpad and swipe up with three fingers, or hit F3 on your keyboard.
Advantages: With easy viewing and switching to documents and windows on the spotlight, it saves time when trying to locate what’s needed. Bonus, it lets you create new spaces/virtual desktops with the open windows saved for further needs.
When you have a number of projects or applications running and open at the same time, Mission Control is the solution because it greatly increases your multitasking and productivity.
How to look things up with Spotlight: Spotlight is an advanced search engine that is available on every Apple gadget that is used to look up anything on the MacBook for example a file, application, or information on the internet.
How to use Spotlight: To use spotlight type in the document, app, or file that you want to find. You are required to use the mac by pressing the command button that comes along with the keyboard space button at the same time. Furthermore, you can also do simple calculations or search for information online with the desktop on.
Why it is effective: With the ability of looking up internet searches, email, contacts, files, calendar events, and even math problem scanning, Spotlight can benefit your productivity greatly. It helps people with multitasking and completing elaborate work in an efficient manner.
Safari: Apple Inc. has created Safari as a fast, safe and secure web browser that offers incredible integration with other Apple products. This app is already part of the preinstalled tools of the Mac Book and helps the users in browsing the internet.
Speed And Security: In addition to surfing the internet at breath taking speeds, the browser is designed to conserving energy. Further, it also uses smart tracking prevention to stop third parties from exploiting targets’ online activities.
Device Sync: One of the benefits of using Safari is the easy ability to open tabs, bookmarks, and even create reading lists on all your Apple products. Other Macs that you are authenticated on should allow you to access your history and tabs while on the iPhone and iPad as long as you are signed in with the same Apple ID.
Migration: Certain preferences like privacy setting and default search engine can be administered by going over to Safari > Preferences. Even more so, he can enable the Reader Mode which gets rid of all savengeing ads.
These factors alone help a user of the system use Safari on Mac OS effortlessly, and thus granting them faster and safer browsing.
Bonus: Useful Tips For Improving The Security Of Your MacBook
The security of your data should be critical because it is too valuable, and threats are always in waiting. Below are a few more tactics that you can apply to your MacBook for optimum protection:
Enable FileVault: In order to turn on FileVault which will help protect your hard dive, go to System Preferences or System Settings > Security & Privacy > Encryption and turn on the FileVault.
Set A Stronger Account Password: You can go to System Preferences or System Settings > Users and Groups and change your password for each account on use.
Activate Find My Mac: In the event that you happen to lose your MacBook, turning this feature on will help you find your device with ease. All you will need to do is go to System Preferences or System Settings > Apple ID > iCloud and turn on the Find My Mac feature.
Final Notes
Your new MacBook should be simple to configure with all the settings you wish to change. Following these guidelines will help you set your MacBook in the shortest time possible, as well as aid in getting used to the macOS environment. Don’t forget to set up your device and test its features!
Also Read: How to Clear Your Browsing History and Data on Safari for iPhone